Do you want to add text to a post or a page? That’s where the paragraph block shines. A WordPress post without paragraphs, is simply hard to imagine.
A post and page can have as many paragraphs as you like. You can keep them to yourself, show them just to a couple of friends, or share them with the world. It’s up to you.

Four ways to start a Paragraph
How do you start a paragraph block? Generally, you don’t have to! It’s the default block. You can start a new paragraph immediately when creating a post or a page.
Or as soon as you’re finished working on a block. The moment you’re done, you land at the beginning of a new paragraph.
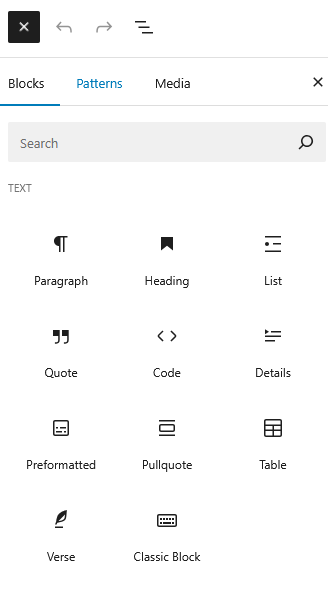
A more mindful way to start a paragraph is with the Block Inserter Icon. Click the ![]() in the upper left corner and select the Paragraph Block.
in the upper left corner and select the Paragraph Block.
Hitting the Block Inserter![]() at the right side of a new paragraph will show you the most recent used Blocks. I dare to wager that the Paragraph Block is among them.
at the right side of a new paragraph will show you the most recent used Blocks. I dare to wager that the Paragraph Block is among them.
Another quick way is transforming another block, like a heading, list, or quote into a paragraph.
Hover over the block that you want to change into a paragraph, click the block icon – the most left icon indicating the block type – and select paragraph.
Transforming a Paragraph Block
On its turn, you can also transform a paragraph into a heading, a list, a code block, or a details block.
A neat design feature is offered by the Group Block.
Putting a paragraph in a group lets the paragraph stand-out, by giving it additional space around the paragraph. You can even add a background colour.
Other functions of the Paragraph Block Toolbar
With the next two buttons, you can drag and a paragraph, and drop it elsewhere. Or move it up and down, one block at a time.
Is English the language of your site, like here, then paragraphs are left aligned by default. The next button shows the current alignment.
Are you not happy with the position? Use that button
to centre your text,
or align it all of to the right side.
Most fonts have a type regular, with a font weight 400, like this paragraph. When the font that you are using does, then that’s the default style.
Should your text to stand-out? Select the text and click the B for bold in the paragraph block toolbar. Now the text feels a little stronger.
You can also use Ctrl+B on Windows and Linux, or Cmd+B on Mac.
Another way of emphasising is to put text in italics. That’s the “I” in the Paragraph block toolbar for, and that is also why it looks that it falls over.
The keyboard shortcut regarding is Ctrl+I or Cmd+I.
When you want to link text to another place on the web, you can turn text into a hyperlink. Use the link icon in Paragraph toolbar, or Ctrl+K.
To link to the homepage, I add / in the field popping up.

That’s a lot of power offered by a little toolbar. And it’s not all! The down arrow gives you even more options to enrich your text with highlights, strikethrough, keyboard input, and more.
Check out this post, for more details on these additional text options.
The ellipsis (![]() ), the colon with three dots at the utmost right of Block Toolbar, gives access to the More options with over a dozen functions to manage your blocks.
), the colon with three dots at the utmost right of Block Toolbar, gives access to the More options with over a dozen functions to manage your blocks.
Read The More Options of the Block Toolbar for more details on these features.
Settings Panel
The majority of the block options are offered through the Block Tool Bar.
Additional features, however, are available through the right sidebar. To get there, click the sidebar icon ![]() , directly left from the Publish/Save-button.
, directly left from the Publish/Save-button.

Here you see three sections:
- a brief description of the block regarding
- colour settings for text and background
- typography settings
- advanced settings which are collapsed by default
Text

For starters, you can change the font colour, and the background of the text.
When you select Text, a little dialogue window appears. You can choose from the Global Colours, as set with the Customiser. Do you want another colour? Then hit the chequered surface. A colour picker shows up.
Now pick here a hex colour, or when you prefer the RGB or HSL colour model, select one of those by clicking the down arrow. Click the ESC-key to go back to the Global Colours, with another ESC you are done.
Background
You have the same options for the background, and one more.
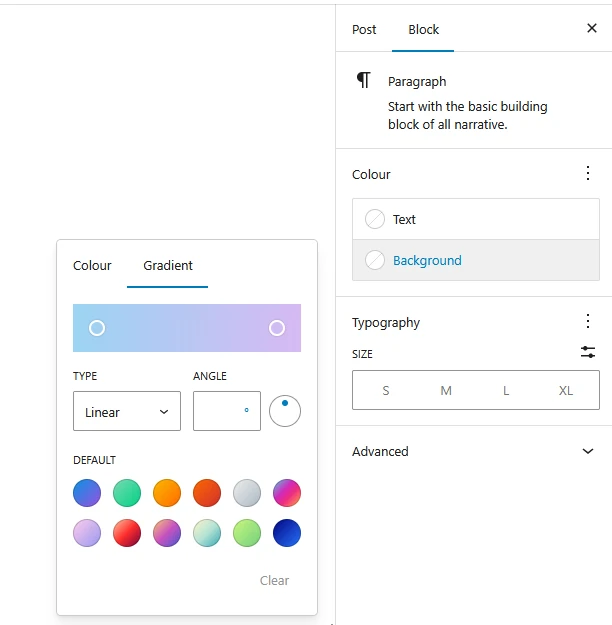
Next to picking a solid background colour, you can get create a sophisticated, gradual blend of colours at the Gradient tab. You can pick one of the twelve precooked colour schemes, or create your own.
You can choose from two types of gradient:
- a linear gradient – from one side to the opposite side
- a radial gradient – from the inside out
Whatever you prefer, next you set your two colours – or the same colour twice! You set the – or the with colour picker – and the alpha channel with the lower channel.
With an alpha value of 100%, the colour is opaque, completely solid. The lower the degree of the alpha channel, the more transparent the colour becomes. Transparency layers make a good match with image backgrounds.
Typography
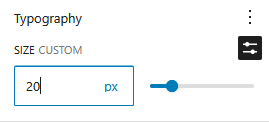
Here you can change the font size, in two distinct ways:
- relatively increase or decrease the font size by selecting S, M, L, or XL, or
- click the settings icon
 and set a custom size in px, em, rem, vw or vh, either manually by entering the desired value, or with the slider
Go to Typography Settings for settings regarding Appearance, Letter spacing, Decoration, Letter case, and Drop cap. Or click the ellipsis (![]() ) next to Typography.
) next to Typography.
Advanced Settings
Blocks also offer fields where you can enter an HTML anchor and one or more CSS classes. Read about these features in Advanced Sidebar Settings of a Block.
The HTML of the Paragraph Block
Each paragraph is opened by an opening <p> tag and closed with a </p> tag.
<p>Do you want to add text to a post or a page? That's where the paragraph block shines. A WordPress post without paragraphs, is simply hard to imagine.</p>